XAMPP:The Complete Guide For Installation on Windows
Welcome to yet another post, on how to build into the coding giant, that you are buried into so deeply. Today,we are going to talk about what make great websites great, and how to tinker around with those tools.
$cfg['Servers'][$i]['controlpass'] = 'root';.
Well for the fron tend html, CSS or frameworks like bootstrap do a pretty good job, for adding functionalities javascript and for plugins jquery can be used on the go.
For the database connectivity, you could use php+MySql or apache server or dozens of frameworks available.
However the most trendy one is PHP+MySql, as 244 million sites ,including facebook, google ,yahoo use the same. And for that, one way would be installing the local hosts.
For installation ,of local hosts, the two available options are :WAMP server or XAMPP server.
In todays post, we will mainly concentrate on installing XAMPP on windows, and enabling all its services.
- Type "XAMPP download" in the google search bar, you will be directed to a page as shown below. Click on the link https://www.apachefriends.org/download.html.
- Once you click the mentioned link you will be taken to the XAMPP download site, where you will be able to see different downloads for windows, linux,OSX and various add-ons. Since we are downloading XAMPP for windows , click on the windows icon for whatever version your PC is.
- Incase you donot know the system version, click Start--> Settings-->System-->About to get all system details.
- Now once you click the blue download button, Xampp.exe will begin to download.It may take a minute or two.
- Once done, now open the file, the Installation wizard will show up, click next -->next--- -->Finish. Xampp is successfully installed on your machine. Now its time to enable its services.
- Open XAMPP from the start panel.
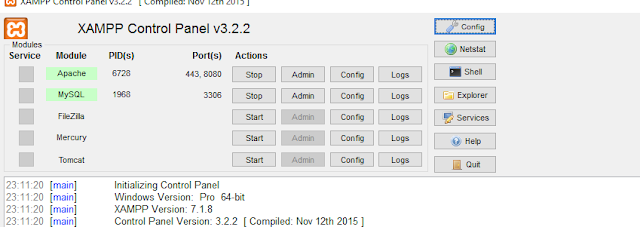
- The Xampp control pannel will be displayed.
- STOP all the services. TO Begin with you shall encounter the "The port 80 is busy error" This means that the system is using port 80 for another purposes. To solve this there are 2 ways:

- You open the command prompt in windows and type "netstat -ano" , press enter. This will give you a lead of whatever ports are being used currently. See what pid is port 80. Then type in "taskkill /pid (whatever pid is of port 80).It may give an error as :Access Denied. In such cases go for way two.
- Open XAMPP control panel, click on the Config button parallel to Apache. Once done, a box of menus will appear, select the very first option, Apache(httpd.conf). Copy the entire file in a text editor (notepad++), and go to line 57,58(listen to ip and listen to port:80). Here change the line to 8080 everyhwere, This means now your local host will run on port 8080.
- Start The MySql Service, even here you may get that port 3307 is busy, according to way 2 change the settings of the file my.ini which you would get on clicking the config parallel to Mysql. Change the lines to listen to port 3306 or anything like that.
- Now both the services will be enabled. To save the changes, click the config button on the top right corner of the Xampp control panel. A dialogue box named Configuration of control pannel will open up, Click Service and port settings. In the next box that opens up, click Apache, enter the port you have modified as 8080 and click on save. Similarly do for MySql. MySql is just beside apache, in the 3rd dialouge box. Click it, save the modified port and close it.
- Now all the two basic services are enabled and working just fine.
- It will display that you have successfully installed XAMPP and enabled all the services. In here you will see PHPINFO, that is like a manual to PHP. You can learn about all the functions and syntaxes from here. Now click on phpMyAdmin for further setup, if it redirects you to a page full of database functionality, you can proceed to code.
- However in more than 80% cases you will come across the following error : "#2002 Invalid settings// No connection could be made as the target machine actively refused it."
- TO solve this error we have two ways:
- The simplest way is to clear all your browsing history, if you are using google chrome, go to the topmost right corner of the screen ,click the 3 vertical dots, or in some cases the excalamatory mark,Click on-->Settings-->Advanced-->Privacy-->Clear browsing data, select all , and clear the data. Refresh The phpmyadmin page, it should start working by now.
- If still the error is not solved, go to the control panel of XAMPP , click on config parallel to Apache, select the last option phpMyAdmin(config.inc.php) , open up in notepad++ , got to line 31 and change it to ::
$cfg['Servers'][$i]['controlpass'] = 'root';.
If still it doesn't work, then change the word controluser to control_test in both the statements. Save the changes and proceed. Now open the browser, type in"htpp://localhost:8080".This will take yo Xampp page, click on my phpMyAdmin, it will take you to the database functionality page:
- Now phpMyadmin is configured,You can now create databases and link it to your web pages. However, for any code to run, you need to save it in the default directory of the Xampp server, ie htdocs. And for running the file you need to go to the browser and type "http://localhost:8080/filename.php" in the address bar.
- This is how to install XAMPP, enable services and get rid of the errors. In the next post, we shall se how to actually connect the database to a basic form using XAMPP sever as a local host and PHP+MySql.


Comments
Post a Comment